Fun with Piet
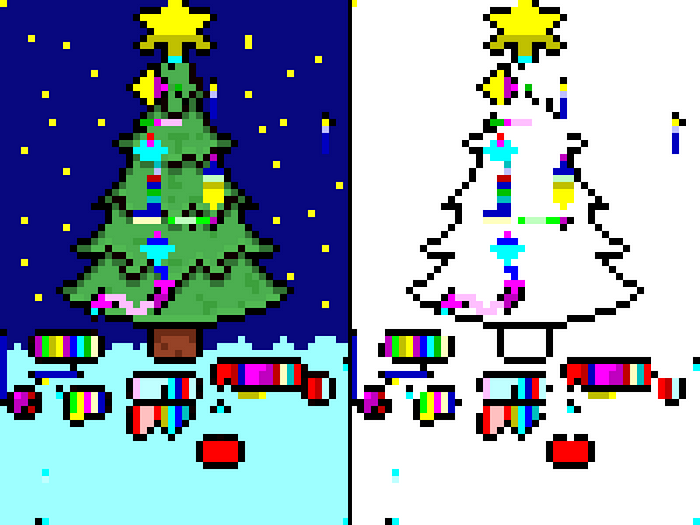
Recently, I discovered an interesting esoteric programming language: Piet. Programs written in this language look like abstract paintings and commands are defined by the color changes in the picture/program. That’s what gives you a lot of freedom to create nice looking and functional programs, which makes it a lot of fun. For example, the below picture is a fully functional Piet program.
Piet Basics
Piet is an esoteric programming language, that is named after and inspired by the artist Piet Mondrian, who “is known for being one of the pioneers of 20th-century abstract art, as he changed his artistic direction from figurative painting to an increasingly abstract style, until he reached a point where his artistic vocabulary was reduced to simple geometric elements.”
Piet programs look like abstract paintings. To achieve this, commands are defined by color changes instead of words or characters. A program (picture) is organized in a grid of codels. Codels are used instead of pixels to make it possible to scale up program pictures and consequently to make it easier to see them. For example, one codel could have a size of 20x20 pixels.
Further, Piet programs are two dimensional and the language is stack based.
In the next subsections I’ll point out some Piet basics. If you want to write programs in Piet, I’d also recommend you to read the official language specification. If you are only interested in my program, you can skip this part and jump to the section “My first Piet Program”.
Program Execution
When running a program, the interpreter starts at the color block, which includes the top left codel. There are two metrics that determine, which color block is executed after the current one:
Direction Pointer (DP)
The DP decides in which direction to continue. If it points to the right, the next codel will be chosen on the right edge of the current color block. Please note, that this edge may be disjoint. The DP can be rotated using the pointer command and it is automatically rotated when it hits a black block or an edge, where the program execution can't continue in that direction after changing the CC (see section "Black and White").
- Possible values: “right”, “down”, “left, “up”
- Initial value: “right”
Codel Chooser (CC)
The CC decides which codel will be chosen on the edge, the DP determines. Imagine you are the interpreter and you are iterating over the color blocks. The DP is pointing to the right and now the interpreter looks from the direction where it comes from at the edge, the DP chose. If the CC points to the left, the codel, that touches the edge on the furthest to the left will be chosen. If the CC points to the right, the codel, that touches the edge on the furthest to the right will be chosen. The CC can be toggled using the switch command, or when a black block or an edge is hit (see section "Black and White").
- Possible values: “left”, “right”
- Initial value: “left”
Color Cycles
There are 18 different colors, you can use to execute commands, I’ll refer to them as “command colors” from now on. The interesting thing about them is, that the color itself doesn’t define which command to execute, but the change in color. But, more on that topic will follow in the next section. There are two additional colors, which are treated a in a special way: black and white. I’ll explain more about them below.
Command Colors
As written above, there are 18 command colors. They consist of 6 different base colors with 3 different lightness levels. These base colors are red, yellow, green, cyan, blue and magenta. The base colors are aligned on the so-called “Hue Cycle”. If you iterate over this cycle, you’ll get the colors in the order they have just been presented. As the name suggests this works cyclically. This means, if you move one step further from magenta, you’ll get to red. This, of course, works in the other direction as well. There exist 3 Hue Cycles: one for each brightness level. They are represented with black arrows in the picture below.
The same principle applies to the lightness level of colors. Each color is aligned on a “Lightness Circle”. As there exist 6 base colors, we have 6 Lightness Circles. Here you can iterate over each circle again. Again, light red is one step darker than dark red because of the cycles. Additionally, dark red is one step lighter than light red because the circles work in both directions. The Lightness Circles are represented by the grey arrows in the picture below.

Black and White
Black blocks restrict the program flow. This means, the program can’t emerge through black blocks and the direction needs to be changed. If the program executor hits a black block, first the Codel Chooser is switched, if it still can't continue, the Direction Pointer is rotated one step clockwise until the interpreter can leave the current block. If it's not possible to leave the current block, the program is terminated. Note that edges just work like black color blocks.
White blocks are basically “free zones”. This means, the interpreter just slides (or floats) through them in a straight line until it hits a block of any other color than white. In the beginning it was a bit unclear, what happens if a black block or an edge follows directly after a white block, so interpreters handle this scenario in two possible ways:
- The same scenario, as when a black block or an edge is hit by a “normal” color block happens (
Codel ChooserandDirection Pointerare rotated). The author of the language stated that this is how we interprets the specification. - The program is terminated (that’s the way, the interpreter I used works).
Commands
As stated above, commands are not defined by the colors themselves, but by the change in color. In more detail, they are defined by how many steps you take on the Color and Hue Cycle. The below printed table shows all possible commands and how to execute them.

Please head over to the official language specification to read more about how each command works.
Piet Interpreters
There are lots of Piet interpreters out there and most of them work slightly different. Therefore, I’d recommend choosing one and sticking to that one. As the author states, there is no official interpreter. I tried various ones, but then I ended up using this interpreter because in my opinion it has the best editor and also debugging worked really nice. Well, really nice means it worked, but that really made me happy after trying some other editors/interpreters ;-).
Hello World
If you are interested in some “Hello World” projects to get you started, you can take a look at the following examples.
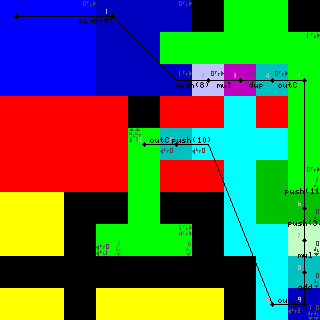
The program above simply prints “Hi” to the console. You can see the program trace in the picture itself, to learn more about it, head over to this link.
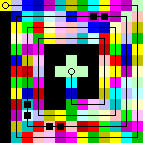
The picture above shows a very artistic way to print “Hello, world!” to the console. Here you can find some detailled information about it.
Check out this page for more sample Piet programs.
My first Piet Program
Somehow I had the idea to solve the first part of day 4 of Advent of Code 2020 with Piet. So I teamed up with a friend, who is also craving to solve any logical puzzle, which comes along.
The given problem
At this day, Santa arrives at the airport and notices that he brought his North Pole Credentials instead of his passport. Those documents are similar, but Santa’s papers are not issued by any country, therefore the required field cid is missing. Luckily, there are problems with the airport security and Santa manages to hack his way into the automatic passport control system. There he aims to "fix" the password validation. "Fixing" in this case means, that the system should validate if all required fields are given. Those fields are byr, iyr, eyr, hgt, hcl, ecl, pid and cid. As Santa doesn't have the field cid on his document, he just decides to make it optional.
The input is a text file with passport data. The passports in this file are separated by new lines. The fields in a passport are separated by spaces or new lines.
Head over to Advent of Code to read the full problem description.
First solution
To get started easier, we decided to not focus on creating a pretty program in the first iteration. We really focussed on functionality and on leaving enough space between color blocks for being able to fix things if we would have happened to forget something. The picture below shows our full solution.
Below, I’ll give my best, to explain what the program is doing in each step. If you would like to analyze it in detail, you can simply download the picture above and import it to a Piet Editor. I’d recommend the one from When Life Gives You a SIGSEGV, but it should work with most of the editors out there.
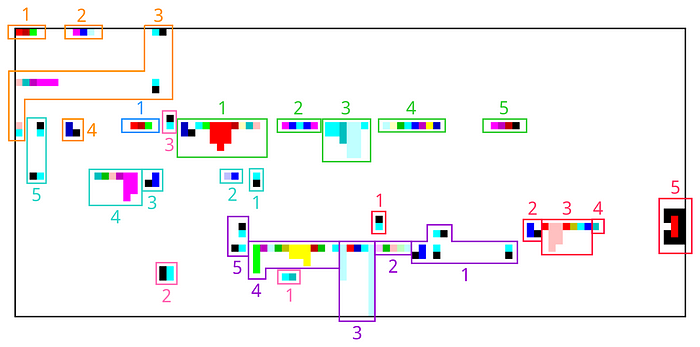
In the above picture, you can see, that I divided the program into 7 sections. Each section is represented by a color and described below.
Initialization (Orange)
In this section the program is initialized. See the below points, to get to know what each part is doing.
- Push 0 onto the stack. The first number on the stack will always be the count of valid passports.
- This part just reads in a character and prints it to the console. We added this, because we had problems with the input parsing of the editor sometimes and this way we made sure, that everything was fine. We just added a “?” at the beginning of the input and checked, if it was printed to the console.
- There is no logic in this part, it’s just a line break. We didn’t know, if we need more initialization logic, so we moved all other logic to the next lines, to make sure, that we have enough space if we need it.
- That’s a very cool thing my friend came up with. We named it
CC-fixerand it just makes sure, that theCCis pointing left.
Initialize new passport (Blue)
In the blue (and very small) section a new passport is initialized. When the program reaches this point, only one value should be on the stack, which is the count of valid passports.
Read in the next key and check it (Green)
This section reads in the next key, and checks if it is cid. If not, the number of valid keys in the current passport is increased by one. If the first character, that is read in, is a new line character, it jumps to the turquoise section.
- Read in the next char, duplicate it and check if its value is 10 (ASCII value for a new line character). If yes, it means that a new passport starts. Therefore, rotate the
DPby one and move on to the turquoise section. If no, the character, that has just been read, is the first character of a new key -> continue with part 2 of the current section. - Read in two more characters, to push the full key onto the stack. Add the values of characters up. This can be done, because the sums of all keys are unique and that’s why the sums can be used to differentiate the keys.
- Push the values 4, 3 and 10 onto the stack.
- Duplicate 10 and multiply and add the numbers in order to get 304 (the sum of the key
cid) on the top of the stack. Then subtract this value from the sum of the key, to check if the key, that was just read, iscid. If yes, rotate theDPby one and continue with the purple section. If no, continue with the next part of the green section. - If the program reaches this point, it read in a new key that is not
cid. Therefore, the number of valid keys in the current passport is increased by one. Then the direction of theDPis changed, because of the black codel at the end and the purple section is executed next.
Dump all characters until the next key starts or the end of the file is reached (Purple)
This section is always executed after a key was read in. Here one character after the other is read in and reviewed. If it is a space or a new line character, it means that the next key will come after it and therefore the dumping loop is stopped. If it is 0 (End of File), the program will be terminated and therefore the loop is stopped as well. In all other cases, the loop just continues to dump characters.
- Set the direction of the
DPto left and the value of theCCto right. - Read in the next character and duplicate it. Then check if it equals 0 (End of File) and if yes, rotate the pointer and continue with the red section to terminate the program. If no, simply continue with part 3 of the current section.
- Duplicate the char again, push 10 (ASCII value for the new line character) onto the stack and subtract those two values to check if the read in character is a new line. If yes, switch the
CC(to left) and therefore continue with the first part of the pink section. Otherwise, leave theCCas it is and continue with part 4 of this section. - Push the numbers that are necessary to multiply and add up to 32 (ASCII value for the space character) onto the stack. Then multiply and add them up, until the value 32 is on top of the stack. Next, subtract this number to check if the current character is a space. If yes, switch the
CC(to left) and therefore continue with the second part of the pink section. Otherwise, leave theCCas it is and continue with part 5 of this section. - Use white, colored and black blocks to adapt the
DPto jump back to part 1 of this section and to execute the loop again to read in and review the next character.
Jump back to the main loop and read in the next key (Pink)
When this point is reached, the value of the previous key is fully dumped and the next key can be read in. Therefore, it dumps the last character, that was read in and then adapts the direction of the DP to jump back to the main loop and to start reading in the next key.
- Pop the last read in character off the stack, as it is not needed anymore.
- Change the direction
DPto up (because it can't go further to the left). - Change the direction of the
DPto right (because it can't go further up) and continue with the green section afterwards.
Validate the valid field count of the current passport and initialize the next passport (Turquoise)
When this point is reached, a new passport starts. This means the valid field count of the previous passport has to be reviewed, and if it is 7, the number of valid passports should be increased by one. Then the next passport should be initialized.
- Change the direction of the
DPto left (because it can't go further down). - Pop the new line character, that has just been read in.
- Use a
CC-Fixerto make sure theCCpoints to the right. - Subtract the top value on the stack (the number of valid fields in the current passport) by 7 and apply the command
noton the result. This means, if the result is 0 the value 1 will be pushed onto the stack instead of the result. If the result is not 0 the value 0 will be pushed onto the stack instead of the result. Add this new value to the total count of valid passports. - Adapt the
DPto loop back to the blue section, that initializes a new passport. (By doing that it passes theCC-fixerof the orange section, which makes sure, that theCCis pointing left).
Print the result to the console and terminate the program (Red)
To reach this point, an End of File character (ASCII value 0) has to be read in. Then this value is popped, the valid field count of the current passport is reviewed and then the total count of valid passports is printed to the console, before the program is terminated.
- Change the direction
DPto right (because it can't go further up). - Use a
CC-Fixerto make sure theCCpoints to the left. - Subtract the top value on the stack (the number of valid fields in the current passport) by 7 and apply the command
noton the result. This means, if the result is 0 the value 1 will be pushed onto the stack instead of the result. If the result is not 0 the value 0 will be pushed onto the stack instead of the result. Add this new value to the total count of valid passports. - Print the total count of valid passports to the console.
- Terminate the program.
A Christmas themed Piet Program
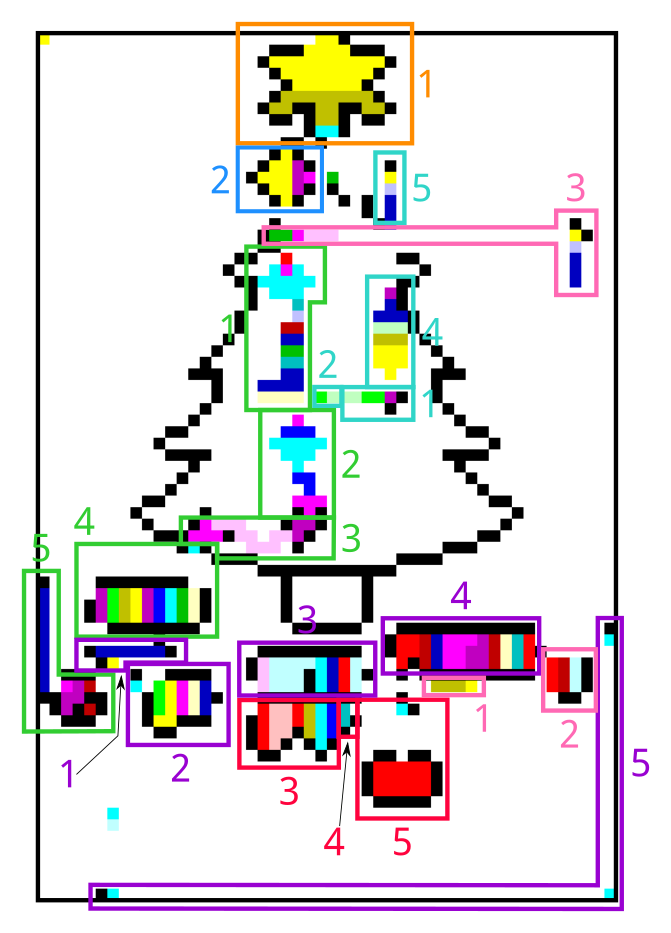
After we got the program working, I decided to make it a bit prettier. As the given problem is part of Advent of Code, I thought some Christmas theme would be nice. Therefore, I designed the below pictured tree. To draw it, I took advantage of the fact, that the interpreter I used, interprets codels with unknown colors as white. You can see the fully colored solution on the left and the solution that only contains valid/known colors on the right.

In the picture below, I highlighted the same blocks, as in the explanation of the first example, that is described above. Please note that some blocks, like the sanity check and line break in the beginning (orange section, part 2–4) are missing, because I decided to not implement them in the themed variant. Further, the commands aren’t exactly the same, but the program can be separated into the same logical blocks. Especially the commands to change directions/make loops are a bit different, because the structure of the program has changed. Nevertheless, if you understand the first example, it will be easy for you to understand this tree as well. Especially, with the explanation squares I added in the picture below.
Please take note of the yellow codel in the top left of the image. This codel is necessary, because the program execution always starts at the top left codel. By starting at this point, the executor “floats” through the white codels, until it reaches the star (orange section, part 1), where the actual program starts.
Well, that’s it :D I hope you enjoyed reading the article and some nice Piet programming is coming up for you.
Merry Christmas,
Kathi
Originally published at https://ksick.dev on December 24, 2020.
